If you have a blog on Blogger and you want to give an extra security feature to your Blogger blog then read this whole article. In this article, I will tell you “How to Enable HTTPS on your Blogger blog with Custom Domain Name”. Earlier this feature was not available for the custom domain on blogger but now you can enable this feature for your custom domain name. Before activating HTTPS feature for your Blogger blog you need to know something about HTTPS.
What is HTTPS and Why You need to Enable on your Domain
Hyper Text Transfer Protocol Secure (HTTPS) is the secure version of HTTP, the protocol over which data is sent between your browser and the website that you are connected to. The ‘S’ at the end of HTTPS stands for ‘Secure’. It means all communications between your browser and the website are encrypted. So if you want to give an Extra security feature for Your blog users then it is free on blogger.
How to Enable HTTPS on your Blogger blog with Custom Domain Name
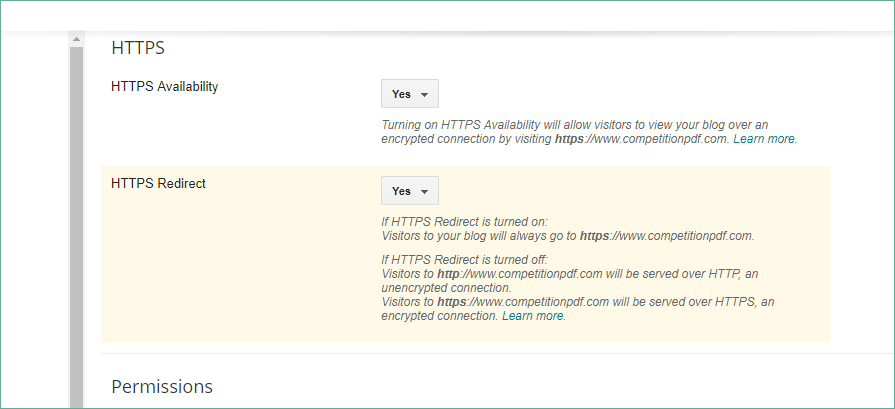
For Enable HTTPS feature for the Custom domain, you need to login to your blogger account by using Email and Password. Now click on Settings Menu available on your left-hand Side and choose basic settings. Here you can see and Extra Section of HTTPS. Click on the drop-down menu given at the front of HTTPS Availability and choose Yes.Now, wait few seconds until blogger checks the HTTPS availability for your blog. After few seconds refresh the page and then click on Next Dropdown Menu available at the front of HTTPS Redirect if enable and Choose Yes. Now wait few seconds and then check your blog on HTTPS. It enables now your users will automatically redirect to the new Version with HTTPS.
How to Enable HTTPS on your Blogger blog with Custom Domain Name Short
In Short, I can say you need to log in your account > click on Settings > Basic Settings > HTTPS Availability click on Yes > HTTPS Redirect Choose, Yes and you have done.
Earlier this Feature was not available for Custom Domain in Blogger. It was available only for Sub-Domain with Blogger. But now, Blogger offers this feature for everyone. If you have a new Blog more than 1 day Old then you can also use this HTTPS feature on your Custom Domain. By using this Feature you can give an Extra security feature to your Blog users. This feature is Free of cost and for the Lifetime.
*Conclusion: So Now, I think you have to understand How to Enable HTTPS on your Blogger blog with Custom Domain Name. If you have any querries related to this topic then leave a comment. Keep this page Bookmarked for Latest updates about this topic.